1편. Fastify 구조 및 요청 생명주기 이해하기
📚 목차
1. 가장 단순한 Fastify 서버 (Hello World)
2. 요청 생명주기 (Lifecycle Hooks)
3. 스키마 기반 검증 (Schema-first) : preValidation 단계에서 수행
4. 플러그인 시스템과 register의 두 가지 목적
5. 실무용 구조: 라우트 분리 및 app/server 관리
6. 전역 에러 핸들링 및 파일 로깅
📂 [GitHub 코드 보러가기] : https://github.com/cericube/nodejs-practice-lab/tree/main/fastify-api-rest
1. 가장 단순한 Fastify 서버 (Hello World)
Fastify는 Node.js를 위한 초고속 웹 프레임워크로, 낮은 오버헤드와 강력한 플러그인 시스템을 자랑합니다. Express와 비슷해 보이지만, 훨씬 더 구조적이고 예측 가능한 개발이 가능합니다.
패키지 설치
cd nodejs-tutorials\fastify-api

npm install fastify
npm install fastify-plugin
Fastify의 시작은 매우 직관적입니다. 인스턴스를 생성하고, 라우트를 등록한 뒤, 서버를 실행하는 3단계로 이루어집니다.
▸ Fastify(): 서버의 심장입니다. 설정값(로깅, 타임아웃 등)을 주입합니다.
▸ get(): HTTP 메서드별로 라우트를 정의합니다.
▸ listen(): 특정 포트에서 요청을 기다립니다.
import Fastify from 'fastify';

// 1. 서버 인스턴스 생성 (로거 활성화)
const fastify = Fastify({
  logger: true,
});

// 2. 라우트 등록
fastify.get('/ping', async (request, reply) => {
  return { pong: true }; // Fastify는 객체를 자동으로 JSON으로 변환합니다.
});

// 3. 서버 실행
const start = async () => {
  try {
    await fastify.listen({ port: 3000 });
  } catch (err) {
    fastify.log.error(err);
    process.exit(1);
  }
};

start();
2. 요청 생명주기 (Lifecycle Hooks)
Fastify의 가장 큰 매력은 Hook(훅)입니다. 요청이 들어와서 응답이 나갈 때까지의 과정을 세밀하게 제어할 수 있습니다.
📌 주요 훅 순서
1. onRequest: 요청을 받자마자 실행 (인증, CORS 등)
2. preParsing: 본문을 파싱하기 전
3. preValidation: 스키마 검증 전
4. preHandler: 비즈니스 로직(Handler) 실행 직전 (권한 체크)
5. Handler: 실제 API 로직
6. onSend: 응답을 보내기 직전 (응답 변조)
7. onResponse: 응답이 완료된 후 (로그 기록)
import Fastify from 'fastify';

fastify.addHook('onRequest', async (request, reply) => {
  request.log.info('1. onRequest: 요청을 받자마자 실행 (인증, CORS 등)');
});
fastify.addHook('preParsing', async (request, reply, payload) => {
  request.log.info('2. preParsing: 본문을 파싱하기 전');
});
fastify.addHook('preValidation', async (request, reply) => {
  request.log.info('3. preValidation: 요청이 유효성 검사되기 전');
});
fastify.addHook('preHandler', async (request, reply) => {
  request.log.info('4. preHandler: 핸들러 실행 전 (권한 검사 가능)');
});
fastify.get('/example', async (request) => {
  request.log.info('5. handler: 실제 API 로직( 핸들러 ) 실행');
  return { message: '5. 핸들러 실행 완료' };
});
fastify.addHook('onSend', async (request, reply, payload) => {
  request.log.info('6. onSend: 응답을 보내기 직전 (응답 변조)');
});
fastify.addHook('onResponse', async (request, reply) => {
  request.log.info('7. onResponse: 응답이 클라이언트로 전송된 후');
});
📌Window PowerShell 에서 한글이 깨지는 경우
Node/Fastify 문제가 아니라 Windows 콘솔의 문자 인코딩(code page) 문제입니다.
Fastify(Pino 로거)는 UTF-8로 로그를 출력하는데, 현재 터미널이 UTF-8이 아닌 코드페이지(보통 CP949/EUC-KR)로 해석해서 한글이 깨지는 것입니다.
1. 직접 명령어로 변경
chcp 65001
[Console]::OutputEncoding = [System.Text.Encoding]::UTF8

== 확인 ==
PS D:\NodejsDevelope\workspace\nodejs-tutorials\fastify-api> [Console]::OutputEncoding
BodyName          : utf-8
EncodingName      : Unicode (UTF-8)
HeaderName        : utf-8
WebName           : utf-8
...
IsSingleByte      : False
EncoderFallback   : System.Text.EncoderReplacementFallback
DecoderFallback   : System.Text.DecoderReplacementFallback
IsReadOnly        : False
CodePage          : 65001
console.log 한글 출력은 정상출력되는 이유
console.log 는 PowerShell의 .NET 출력 스트림을 쓰고,
Pino(Fastify logger)는 Node의 low-level stdout 스트림을 직접 쓰기 때문에 PowerShell에서 인코딩 처리 경로가 다릅니다.
2. 프로필에 UTF-8 설정 추가
1. 프로파일 열기
New-Item -Type File -Path $PROFILE -Force
notepad $PROFILE

2. 프로필에 UTF-8 설정 추가
chcp 65001 | Out-Null
[Console]::OutputEncoding = [System.Text.Encoding]::UTF8

3. 저장 후, PowerShell 완전히 종료 후 다시 실행
[Console]::OutputEncoding

== 출력 예시 ==
BodyName     : utf-8
EncodingName : Unicode (UTF-8)
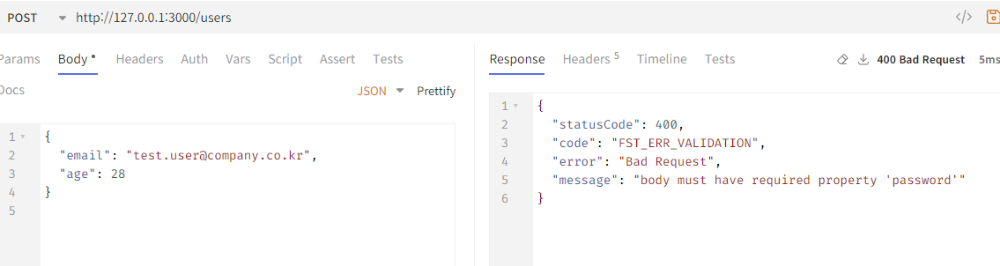
3. 스키마 기반 검증 (Schema-first) : preValidation 단계에서 수행
Fastify는 별도의 유효성 검사 라이브러리 없이도 JSON Schema를 통해 입력을 검증합니다.
잘못된 요청은 핸들러에 도달하기도 전에 400 Bad Request로 걸러집니다.
fastify.post('/users', {
  schema: {
    body: {
      type: 'object',
      required: ['email', 'password'],
      properties: {
        email: { type: 'string', format: 'email' },
        password: { type: 'string', minLength: 8 },
        age: { type: 'integer' }
      },
    },
    response: {
      201: {
        type: 'object',
        properties: {
          id: { type: 'string' },
          success: { type: 'boolean' }
        }
      }
    }
  }
}, async (request, reply) => {
  // 스키마를 통과한 데이터만 핸들러에 들어옵니다.
  const { email } = request.body;
  return reply.code(201).send({ id: '123', success: true });
});
4. 플러그인 시스템과 register의 두 가지 목적
Fastify에서 모든 것은 플러그인이며, 이를 연결하는 유일한 도구는 register입니다.
register는 단순히 코드를 분리하는 것을 넘어, 라우트 등록과 정책 주입이라는 두 가지 핵심 역할을 수행합니다.
| 구분 | 라우트 등록 | 기능 정책 주입(fp+decorate) |
| 개념적 목적 | API 엔드포인트 구성 | 공통 기능·정책·의존성 주입 |
| 플러그인 형태 | 일반 Fastify Plugin | fastify-plugin(fp)로 래핑된 Plugin |
| 주요 역할 | URL + Method + Handler 등록 | DI, 정책 적용, 라이프사이클 관리 |
| 대표 API | fastify.get() fastify.post() addHook() (로컬 정책) |
decorate() decorateRequest() addHook() (전역/공유 정책) |
| 캡슐화(Encapsulation) | 유지됨 (독립 스코프) | 기본은 유지되나, fp 사용 시 상위/형제까지 공유 가능 |
| 적용 범위 | 해당 플러그인 + 하위 라우트 그룹 | 이후 등록되는 모든 스코프에서 사용 가능 |
| 의존성 방향 | 인프라 플러그인에 의존 | 라우터에 의존하지 않음 |
| prefix 사용 | 거의 항상 사용 | 거의 사용 안 함 |
| 대표 사용 사례 | /users, /posts 모듈화 | Prisma, Redis, Auth, Logger, Metrics |
1. 목적 1: 라우트 등록 (도메인 분리)
플러그인을 통해 연관된 라우트들을 하나의 단위로 묶어 관리합니다.
이때 Fastify의 캡슐화(Encapsulation) 덕분에 특정 라우트 그룹에만 적용되는 독립적인 환경을 구축할 수 있습니다.
// user.routes.ts
export async function userRoutes(fastify: FastifyInstance) {
  // 이 훅은 authRoutes 내의 라우트에만 영향을 줍니다.
  fastify.addHook('onRequest', async (req) => {
    req.log.info('Auth 관련 요청 진입');
  });

  fastify.get('/', async () => {
    return { users: [] };
  });

  fastify.get('/:id', async (request) => {
    const { id } = request.params as { id: string };
    return { id: id, name: 'Jone Doe' };
  });
}

// app.ts에서 사용
fastify.register(userRoutes, { prefix: '/users' });
2. 목적 2: 전역 기능 및 정책 주입 (Decorate & Cross-cutting Concerns)
애플리케이션 전역에서 공유해야 할 기능(Functionality)이나 상태(State)를 주입합니다.
TypeScript 환경에서는 decorate로 추가된 속성을 인식시키기 위해 타입 보강(Declaration Merging)이 필수입니다.
▸ 플러그인 정의 (plugins/hello.plugin.ts)
import fp from 'fastify-plugin';
import type { FastifyRequest } from 'fastify';

// TypeScript 타입 보강: 다른 파일에서도 타입 에러 없이 속성에 접근 가능하게 함
declare module 'fastify' {
  interface FastifyRequest {
    timestamp: string; // request.timestamp 정의
  }
  interface FastifyInstance {
    sayHello(name: string): string; // fastify.sayHello() 정의
  }
}

export default fp(async (fastify) => {
  // 1. 인스턴스 장식 (decorate): 전역 유틸리티 함수 추가
  fastify.decorate('sayHello', (name: string) => {
    return `Hello, ${name}!`;
  });

  // 2. 요청 객체 장식 (decorateRequest): Getter/Setter를 통한 상태 관리
  fastify.decorateRequest('timestamp', {
    getter(this: FastifyRequest) {
      return (this as any)._timestamp;
    },
    setter(this: FastifyRequest, value: string) {
      (this as any)._timestamp = value;
    },
  });

  // 3. 전역 정책 주입 (Hook): 모든 요청의 시작 시간을 기록
  fastify.addHook('onRequest', async (request) => {
    request.timestamp = new Date().toISOString();
  });
});
▸ 플러그인 등록 및 사용
등록된 플러그인은 Fastify의 의존성 그래프에 따라 순서대로 로드됩니다.
import helloPlugin from 'plugins/hello.plugin.ts';

// 플러그인 등록
fastify.register(helloPlugin);

fastify.get('/greet', async (request) => {
  // 플러그인에서 decorate한 함수와 데이터를 사용합니다.
  return {
    greeting: fastify.sayHello('User'),
    time: request.timestamp
  };
});
{"greeting":"Hello, User!","time":"2026-01-20T08:10:03.430Z"}
5. 실무용 구조: 라우트 분리 및 app/server 관리
실무에서는 API 가 늘어남에 따라 라우트를 별도 파일로 분리하고, 서버 설정(app.ts)과 실행(server.ts)을 엄격히 구분합니다.
1. 라우트 분리 (routes/user.route.ts)
이점: 기능을 단위별로 묶어 관리하기 편하며, /users, /orders 처럼 도메인별로 prefix를 깔끔하게 나눌 수 있습니다.
import type { FastifyInstance } from 'fastify';

export async function userRoutes(fastify: FastifyInstance) {
  fastify.get('/', async () => {
    return { users: [] };
  });

  fastify.get('/:id', async (request) => {
    const { id } = request.params as { id: string };
    return { id: id, name: 'Jone Doe' };
  });
}
2. app.ts (서버 정의)
import Fastify from 'fastify';
import { userRoutes } from './routes/user.routes';

export function buildApp() {
  const app = Fastify({ logger: true });

  // 라우트 등록 (엔드포인트는 /users로 시작하게 됩니다)
  app.register(userRoutes, { prefix: '/users' });
  app.get('/health', async () => ({ status: 'ok' }));

  return app;
}
3. server.ts (서버 실행)
import { buildApp } from './app';
const PORT = 3000;

async function startServer() {
  const app = buildApp();

  try {
    await app.listen({ port: PORT });
    console.log(`🚀 Server running on http://localhost:${PORT}`);
  } catch (err) {
    app.log.error(err);
    process.exit(1);
  }
}

startServer();
6. 전역 에러 핸들링 및 파일 로깅
1. 전역 에러 핸들링
에러 처리를 일관되게 관리하면 클라이언트에 항상 정해진 규격의 에러 메시지를 보낼 수 있습니다.
fastify.setErrorHandler((error, request, reply) => {
  request.log.error(error);
  const err = error as FastifyError;

  if (err.validation) {
    return reply.status(400).send({
      error: 'Bad Request',
      message: '입력값이 올바르지 않습니다.',
      details: err.validation,
    });
  }

  reply.status(err.statusCode || 500).send({
    success: false,
    message: err.message || '서버 내부 오류가 발생했습니다.',
  });
});
2. 파일 로깅
Fastify는 설계 단계부터 Pino를 기본 로거로 채택하여 통합되어 있습니다.
기본적으로 로그는 콘솔(stdout)에 출력되지만, 실무에서는 파일로 기록하거나 콘솔과 파일을 동시에 사용하는 경우가 많습니다.
const fastify = Fastify({
  logger: {
    level: 'info',
    // 파일로 로그를 기록하고 싶은 경우 (Pino v7+ 기준)
    transport: {
      target: 'pino/file',
      options: {
        destination: path.join(__dirname, 'logs/app.log'),
        mkdir: true // 폴더가 없으면 자동 생성
      }
    }
  },
});

// 만약 콘솔과 파일에 동시에 기록하고 싶다면 'pino.multistream'을 사용하거나
// 'pino-pretty'와 함께 아래와 같이 설정할 수 있습니다.
/*
logger: {
  level: 'info',
  transport: {
    targets: [
      // 콘솔 출력 (개발 환경)
      {
        target: 'pino-pretty',
        level: 'info',
        options: {
          colorize: true,
          translateTime: 'yyyy-mm-dd HH:MM:ss',
          ignore: 'pid,hostname',
        },
      },

      // 파일 출력 (운영/보관용)
      {
        target: 'pino/file',
        level: 'info',
        options: {
          destination: 'logs/app.log',
          mkdir: true,
        },
      },
    ],
  },
},
*/

fastify.get('/ping', async (request, reply) => {
  request.log.info('Ping 요청 처리 중');
  return { pong: true };
});| target 값 | 패키지명 | 용도 |
| pino-pretty | pino-pretty | 로그를 사람이 읽기 좋은 포맷으로 출력 (주로 개발 환경) |
| pino/file | pino(내장) | 파일로 JSON 로그 기록 |
| pino-roll | pino-roll | Node 레벨 로그 파일 회전 (서드파티) |
| pino-loki | pino-loki | Grafana Loki로 로그 전송 |
| pino-elasticsearch | pino-elasticsearch | Elasticsearch로 로그 전송 |
3. 로그 회전(Log Rotation)
로그 파일리 너무 커지는 것을 방지하려면 ping-roll 같은 전송 타겟을 사용합니다. 이를 통해 날짜별 혹은 파일 크기별로 로그를 쪼개서 저장할 수 있습니다.
logger: {
  transport: {
    target: 'pino-roll',
    options: {
      file: path.join(__dirname, 'logs/app.log'),
      frequency: 'daily',
      size: '10m', // 또는 파일 크기 기준 (10MB)
      limit: { count: 7 }, // 최근 7개 파일만 유지
      mkdir: true
    }
  }
}
※ 게시된 글 및 이미지 중 일부는 AI 도구의 도움을 받아 생성되거나 다듬어졌습니다.
'4.Node.js > 실무익히기' 카테고리의 다른 글
| [REST API] 6편. Fastify 스키마 검증, 전역 에러 처리, 로그 설계 : try/catch 지옥 벗어나기 (0) | 2026.03.25 |
|---|---|
| [REST API] 5편. Layered 모듈 적용 하기: Schema-First, DTO, TypeBox (0) | 2026.03.24 |
| [REST API] 4편. Fastify + Prisma 구조 설계 하기: env, config, plugin (0) | 2026.03.18 |
| [REST API] 3편. Fastify API 서버 기본 골격 구현하기 : app, server (0) | 2026.03.17 |
| [REST API] 2편. API 서버 아키텍처 설계하기 : 프로젝트 구조, ER 설계, Prisma 모델링 (0) | 2026.03.11 |